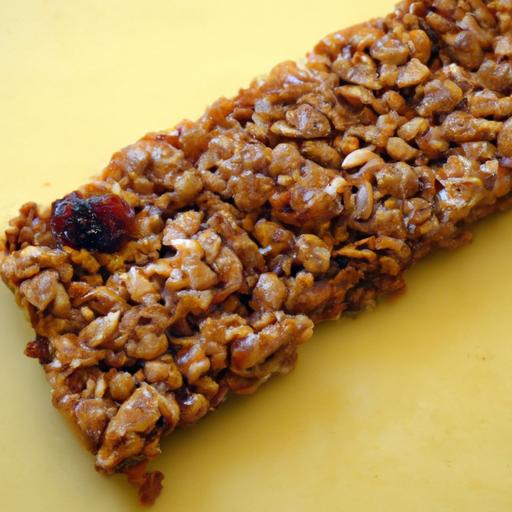


In a world where busy mornings and midday cravings collide,finding a snack that’s both nourishing and effortless can feel like a small victory. Enter the humble granola bar: a pocket-sized powerhouse of energy,flavour,and convenience. But why settle for store-bought varieties loaded with extras when you can create your own homemade delights with just four simple ingredients? Welcome to your ultimate guide to crafting simple and tasty 4-ingredient granola bars – where minimalism meets mouthwatering goodness. Whether you’re a kitchen newbie or a seasoned snacker, this easy recipe will transform wholesome pantry staples into the perfect grab-and-go treat. Let’s unwrap the secrets to quick, customizable, and irresistibly tasty granola bars that make healthy snacking a joyous ritual.
Simple & Tasty: Homemade 4-Ingredient Granola Bars Guide brings you a perfect balance of wholesome ingredients for snack-time bliss. These bars hail from minimalist, health-conscious kitchens looking to craft an energizing treat with ease and versatility. Crafted with care, they’re ideal not only for busy mornings but also for hiking adventures or as a nutritious pick-me-up throughout your day. The magic lies in the simplicity-just four ingredients combined to produce a crunchy, chewy texture that melts delightfully on the tongue.
Prep and Cook Time
- Planning: 10 minutes
- Cooking: 15 minutes
- Cooling & Setting: 1 hour
- Total Time: Approximately 1 hour 25 minutes
Yield
Makes about 12 bars, perfect for sharing or packed lunches.
Difficulty Level
Easy – ideal for beginners and anyone looking for a fuss-free snack solution.
The Essential Ingredients for Perfectly Balanced Granola Bars
- 2 cups rolled oats – the hearty foundation that provides fiber and chewiness.
- 1 cup nut butter (natural almond or peanut butter) – acts as the binder and adds creaminess plus rich protein.
- ½ cup honey or maple syrup – for just the right amount of natural sweetness and stickiness.
- ½ cup mix-ins (such as chopped nuts, seeds, or dried fruit) – for added texture and burst of flavor.
Step-by-Step Preparation Tips for effortless Homemade Granola
- Warm your nut butter and honey gently in a small saucepan over low heat or microwave for 20 seconds. This makes mixing smooth and helps bind the oats thoroughly.
- In a large bowl, combine the rolled oats and your chosen mix-ins evenly to ensure each bite bursts with texture.
- Pour the warmed nut butter and honey mixture over the dry ingredients. Use a sturdy spatula to fold everything together until all oats are coated and sticky.
- Press the mixture firmly into a parchment-lined 8×8-inch pan. Use the bottom of a glass for even compression-this helps the bars hold their shape perfectly after baking.
- Bake at 350°F (175°C) for 14-15 minutes until edges turn light golden brown.the aroma will hint when they’re just right-be careful not to overbake to keep a tender chew.
- Cool completely in the pan before cutting into bars. This chilling phase is essential to create neat, firm bars that don’t crumble.
Creative Variations to Customize Your Four-Ingredient Recipe
- Swap rolled oats for gluten-free oats to accommodate dietary needs without compromising texture.
- Try sunflower seed butter for a nut-free choice, paired nicely with pumpkin seeds as a mix-in.
- Add a teaspoon of ground cinnamon or vanilla extract into the liquid mix for warm, aromatic notes.
- Substitute honey with pure maple syrup to create a vegan-friendly version that’s just as sweet and sticky.
- For a burst of tartness, incorporate dried cranberries or chopped apricots as your mix-ins.
Storing and Serving Suggestions to Keep Your Bars Fresh and Delicious
Wrap each bar tightly in parchment paper or plastic wrap to preserve freshness. store bars in an airtight container at room temperature for up to 5 days, or refrigerate for up to 2 weeks.
For longer storage, freeze the bars individually, then transfer them to a freezer-safe bag – thaw at room temperature for 20 minutes before serving.
Serving ideas: Present your homemade granola bars on a rustic wooden board alongside a bowl of fresh berries or sliced apples. Garnish with a drizzle of melted dark chocolate or sprinkle a pinch of sea salt on top for a gourmet touch. These bars pair beautifully with a cup of herbal tea or a chilled glass of almond milk for a wholesome mini-meal.

Nutritional Data per Bar
| Calories | Protein | Carbs | Fat |
|---|---|---|---|
| 180 kcal | 5g | 22g | 8g |
Chef’s Notes: Tips for Success
- Press firmly: The firmer you pack the mixture into the pan, the better the bars will hold together without crumbling.
- Mix-ins: Avoid adding overly moist ingredients that can affect texture-dried fruit and toasted nuts work best.
- Nut butter choice matters: Natural, unsweetened nut butters enhance the wholesome flavor and texture.
- Cutting tips: Use a sharp knife warmed by running it under hot water for cleaner bar slices.
- Make-ahead: Bars keep well in the fridge and are perfect for batch prepping. freeze extras to extend their shelf life.
Elevate your snack routine with more inspiring recipes like Healthy No Bake Energy Bites. For in-depth nutritional advice and wholesome eating tips, check out EatRight.org.
Q&A
Q&A: Simple & Tasty Homemade 4-Ingredient Granola Bars Guide
Q1: Why should I make homemade granola bars instead of buying them?
A1: Homemade granola bars let you control the ingredients,ensuring no hidden sugars or preservatives. Plus,they’re fresher,more customizable,and a fun way to get creative in the kitchen without any fuss!
Q2: What are the four basic ingredients needed for these granola bars?
A2: The magic four typically include rolled oats,a natural sweetener (like honey or maple syrup),a nut or seed butter (such as almond or sunflower),and a mix-in like dried fruits or nuts for texture and flavor.
Q3: Can I make these bars vegan and gluten-free?
A3: absolutely! Use maple syrup or agave rather of honey to keep it vegan.For gluten-free bars, simply make sure your oats are certified gluten-free. It’s that easy to tailor them to your dietary needs!
Q4: How do I get my granola bars to hold together without falling apart?
A4: The nut or seed butter acts as the natural glue, binding the oats and mix-ins. Pressing the mixture firmly into the pan before baking or chilling also helps create bars that stay intact when sliced.
Q5: Can I customize the flavor without adding extra ingredients beyond the four?
A5: Yes! Swap your nut butter (try cashew instead of peanut), switch up your dried fruits (cranberries to apricots), or choose different nuts and seeds-all while sticking to just four ingredients. Small tweaks make a big flavor difference!
Q6: What’s the best way to store homemade granola bars?
A6: Wrap them individually or place them in an airtight container. They’ll stay fresh at room temperature for about a week, and you can extend shelf life by refrigerating or freezing, perfect for busy days on the go.
Q7: How do I prevent my homemade granola bars from being too dry or too sticky?
A7: Balance is key! Measure ingredients carefully-too much sweetener can make bars sticky, while too little nut butter or syrup can cause dryness. If needed,lightly warm the syrup and nut butter before mixing to get a uniform consistency.
Q8: Can kids help make these bars?
A8: Definitely! This recipe is kid-friendly-little hands can mix, press, and help choose fun mix-ins. It’s a delicious way to teach them about healthy snacking and kitchen creativity.
Q9: What are some creative mix-ins I can add as my fourth ingredient?
A9: Think beyond the usual-try dried mango, toasted coconut flakes, chopped pistachios, or chia seeds.Each adds a unique texture and burst of flavor,keeping your bars exciting with every bite.
Q10: do I need to bake these granola bars?
A10: Not necessarily! Some recipes call for baking to deepen flavor and crispness, but many 4-ingredient bars set beautifully in the fridge and are chewy and delicious without heat. Choose what works for your time and texture preference.
Future Outlook
Whipping up your own 4-ingredient granola bars proves that simplicity and flavor can go hand in hand. With just a handful of wholesome ingredients and minimal effort,you’re equipped to create a snack that’s as nourishing as it is delicious. Whether you’re rushing out the door or settling in for a cozy afternoon, these homemade bars offer a perfect balance of taste and convenience. So next time hunger strikes, remember: great snacks don’t have to be elaborate-they just need a little creativity and the right ingredients. Happy snacking!